 vibgg
Guides · 4 min read
How to sign up for Bitget: referral code, ID check and futures
Open a Bitget account step by step: where the referral code goes, identity verification, moving USDT into USDT-M futures, and how to make sure a fee rebate applies.
Bitget's sign-up takes a few minutes and asks for no documents until identity verification. The step to get right is the referral code: Bitget's exchange help pages describe entering it during sign-up and say nothing about adding it afterwards, so treat sign-up as the only chance. This guide follows Bitget's own help articles and covers moving funds into USDT-M futures.
Disclosure: the sign-up links on vibgg are referral links. vibgg's Bitget link is set to return 20% of the trading fees you pay as a rebate. The steps are the same with or without a referral link.
Before you start
- Check that Bitget serves your region. Bitget shows a notice when a visitor is in a region it does not serve; it did so for the visit behind the screenshot below, which came from Japan. Do not try to get around it.
- Check the address. Bitget asks users to confirm they are on its official website before signing up.
- Have an email address or phone number ready. Google, Telegram and wallet sign-up are also offered.
Step 1: sign up through the referral link
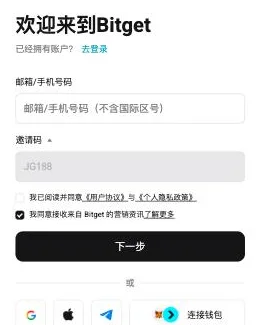
- Open the Bitget sign-up page and choose email or mobile number.
- Check the referral code. Bitget lists it as optional, in the same step as your email or phone number; arriving through the link fills it in.
- Accept the user agreement and privacy policy and select Next.
- Create a password that meets Bitget's length and character rules, then complete the captcha.
- Enter the six-digit code sent to your email or phone to finish.
- Bitget recommends turning on two-factor authentication under Security in your profile settings straight away.
Step 2: verify your identity
Registration needs no documents, but Bitget requires identity verification for futures trading. Start it from the prompt after you log in; Bitget reviews the submission and emails you when it is done. The documents accepted depend on your country.
Step 3: move USDT into USDT-M futures
Bitget keeps spot and futures balances apart, so funds have to be moved before a futures trade. In the app, open Assets, choose Transfer, select Spot to USDT-M Futures, enter the amount and confirm; on the website the same option sits under the wallet icon at the top right. Bitget says transfers are free and immediate. Accounts upgraded to Bitget's unified trading account trade from a single balance instead.
Then set the margin mode and leverage on the order panel. Leverage changes the margin, not the funding: funding is charged on the position's full value. The guide to what leverage costs and the guide to funding and liquidation risk cover both choices.
Making sure the fee rebate applies
Bitget's referral programme page says an invitee must fill in the code for the referral to be recognised, so the locked code on the form is the thing to check. A referral rebate, where one applies, is paid after the trade; it does not change the fee shown on the order.
Through vibgg's link, the rebate is 20% of the trading fees you pay.
Bitget's help pages do not say where an invitee sees the rebate. Watch your asset history for rebate credits after your first trades, and contact Bitget support with your account's referral code if nothing appears.
What your first futures trades cost
A regular Bitget account pays 0.02% as a maker and 0.06% as a taker on USDT-M futures, before any rebate. Market orders pay the taker fee on the way in and again on the way out; resting limit orders pay the maker fee.
Funding is charged on top, at each settlement. The Bitget fee page shows every VIP level and what a month of trading costs at each volume, and the funding fee calculator compares a position's funding on Bitget with the other four exchanges.